


Consider working on a website to provide customers with the best possible user experience and seamless flow. While testing the website, you might find all automated tests passing on all browser and platform combinations with zero issues. However, as soon as the website goes live, bug reports come in large numbers.
These bugs are not related to the website’s functionality but to its user interface and user experience. They affect the website’s appearance, making it less user-friendly regarding its usability, navigation, and visual appeal. This is because automation testing typically only checks the flow, not whether the user interface (UI) appears correctly. Automation testers have been greatly concerned about this and are looking for ways to deal with it.
Make your XML code easy to read and understand with our free online XML Prettify tool. Format your code for better readability and save time!
The solution to this problem is visual testing. It helps to verify the visual behavior of the AUT (Application Under Test) and checks if the visual aspects of the website, such as the shape, size, color, and positioning of the elements on the webpage, are correctly placed and aligned as per the expected design on different browsers and their versions, operating systems, and screen sizes.
This is important because each platform, browser, and screen size has different properties, such as resolution and support for different fonts and colors. These properties must be verified to ensure the website looks and functions correctly on all platforms and devices, thus not restricting customers to certain platforms.
One of the most popular visual testing tools is Storybook, which we will implement in this blog. Storybook is an open-source tool for developing and testing user interfaces (UIs) in isolation from the rest of an application. Each piece of UI in Storybook is an independent component.
One advantage of components is that we don’t need to load the entire application to test a specific UI component. We can render the component in isolation and test it before moving on to the rest of the application. This helps us focus on each variation of a visual component, even the hard-to-reach edge cases. It also ensures that the component behaves consistently across platforms and versions.
In this blog on Storybook visual testing, we will learn about visual testing and its importance for web applications. We will also know about Storybook, how it works, and how to integrate it with web projects. To demonstrate Storybook visual testing, we will use a cloud platform like LambdaTest to access various browsers and operating system versions to test the web interface for the best results.
Let’s get started.
What is Visual Testing?
Visual testing is a software testing technique that verifies and validates an application’s Graphical User Interface (GUI). It focuses on the visual aspects of the GUI, such as layouts, colors, fonts, images, and overall aesthetics, to ensure that they are consistent, correct, and visually appealing across different platforms and devices.
Need to convert hex to decimal? Our online Hex to Decimal Converter tool converts hexadecimal to decimal numbers quickly. Get your conversions done in no time.
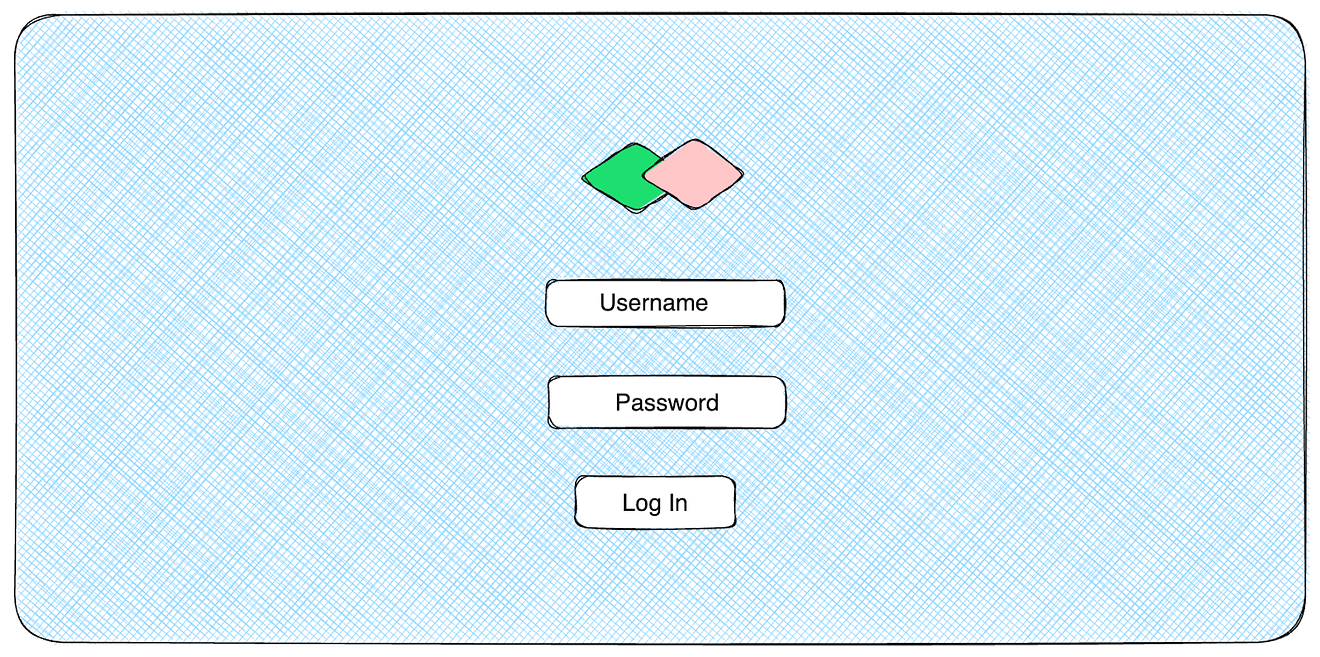
Consider a scenario of login screen version 1 like the one below:
This screen was updated to accommodate two new buttons, but that leads to alignment issues like in below version 2:
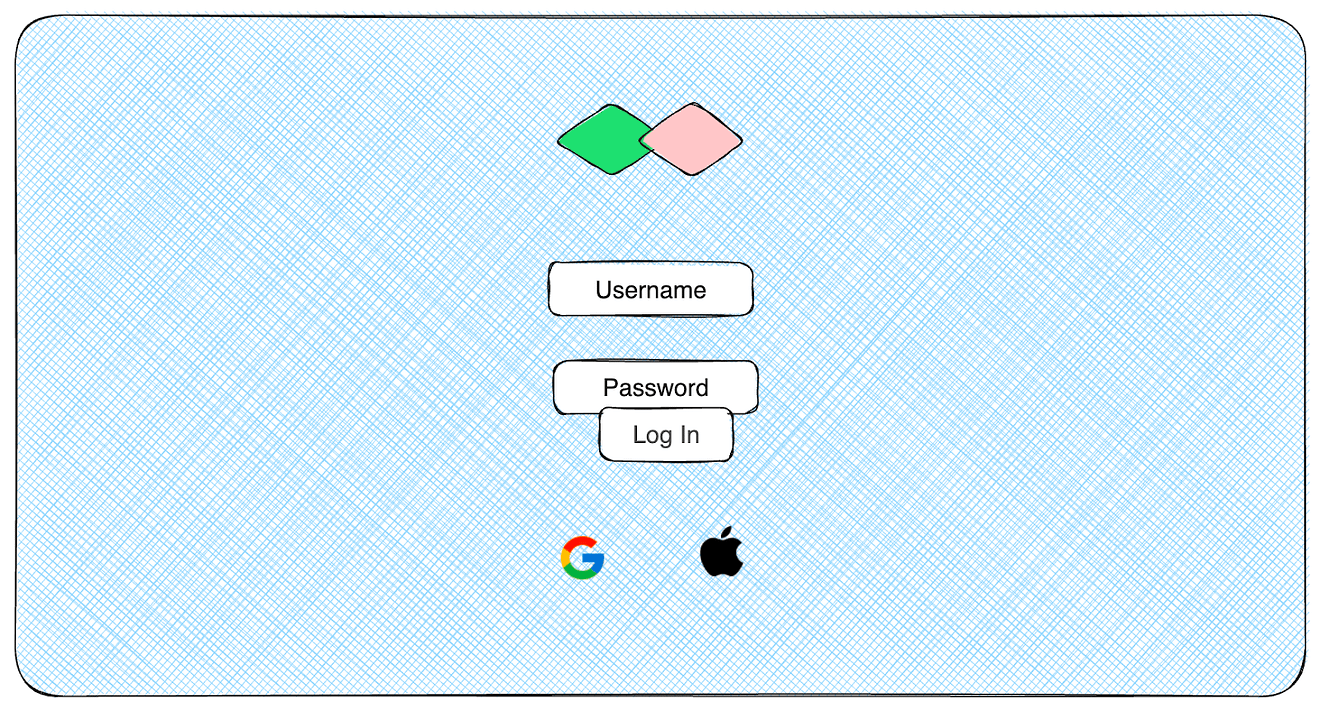
Such visual issues can be more prominent while working with web applications and lead to a bad user experience.
Conducting visual testing helps to enhance the user experience, maintain brand consistency, and prevent visual defects in applications, ultimately leading to a more polished and user-friendly product.
It can also identify issues related to responsiveness and multimedia elements, such as logos, icons, videos, and animations. Human testers can perform visual testing manually or using automated scripts and tools like Storybook. Automated visual testing compares the UI under test with reference images or expected results to detect discrepancies.
Conducting visual testing helps to enhance the user experience, maintain brand consistency, and prevent visual defects in applications, ultimately leading to a more polished and user-friendly product.
Keep your data safe and secure by using our free online Base64 Encode. With our tool, you can easily convert any type of data into a secured Base64 string. Try it now!
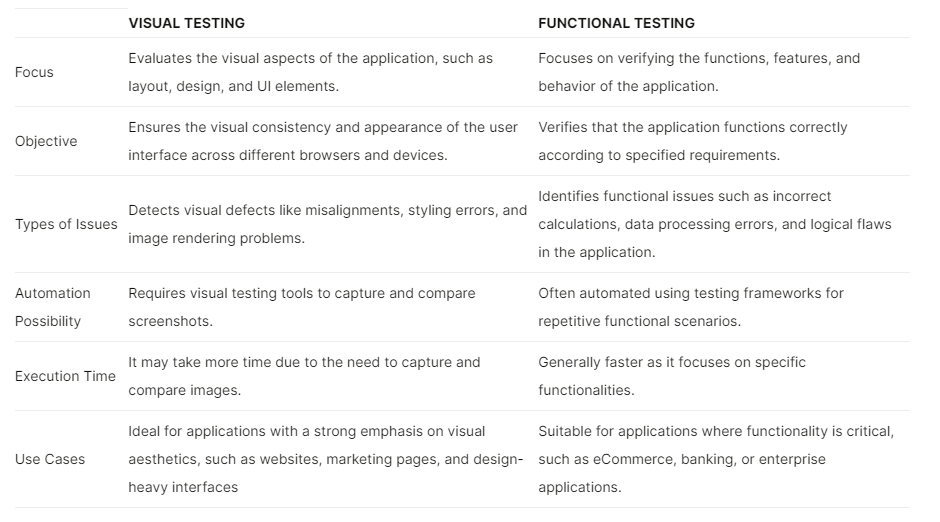
How is Visual Testing different from Functional Testing?
Visual and functional testing are two types of testing that verify different aspects of an application. Visual testing focuses on the appearance and user interface, while functional testing focuses on the application’s features. Functional testing verifies that the application works as expected, while visual testing verifies that the application’s visual elements appear correctly on different devices, browsers, and operating systems.
Visual testing is often used in conjunction with functional testing to ensure that an application is both functional and visually appealing.
How does Visual Testing Work?
Visual testing works by comparing screenshots. It does this by comparing the actual UI to a base screenshot of the page.
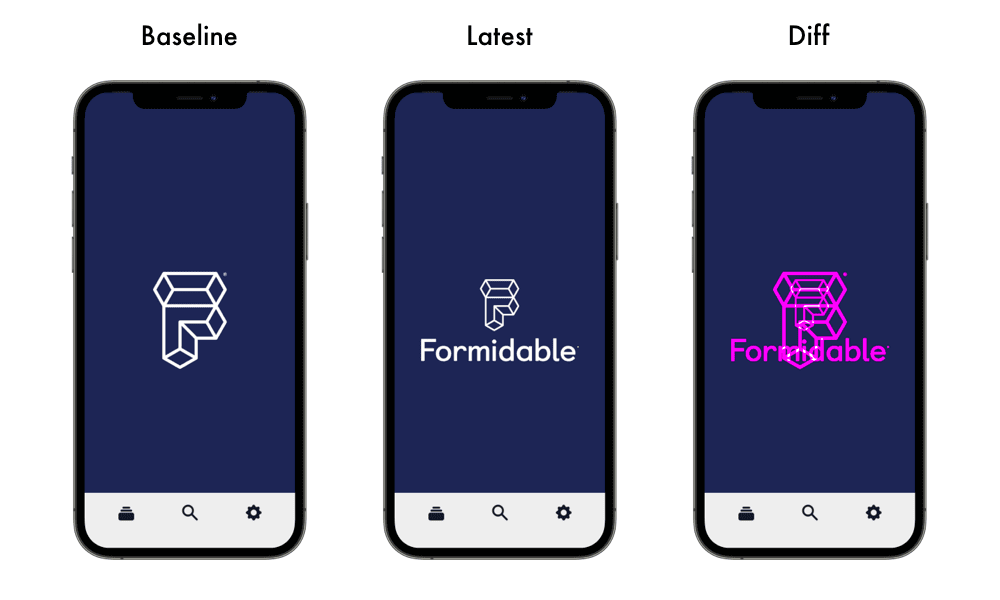
The base image is captured and is used as a reference whenever the visual test is executed. Each test run generates a new screenshot, which is then compared to the base screenshot. If any differences are found, the test is marked as failed. Otherwise, it is passed.
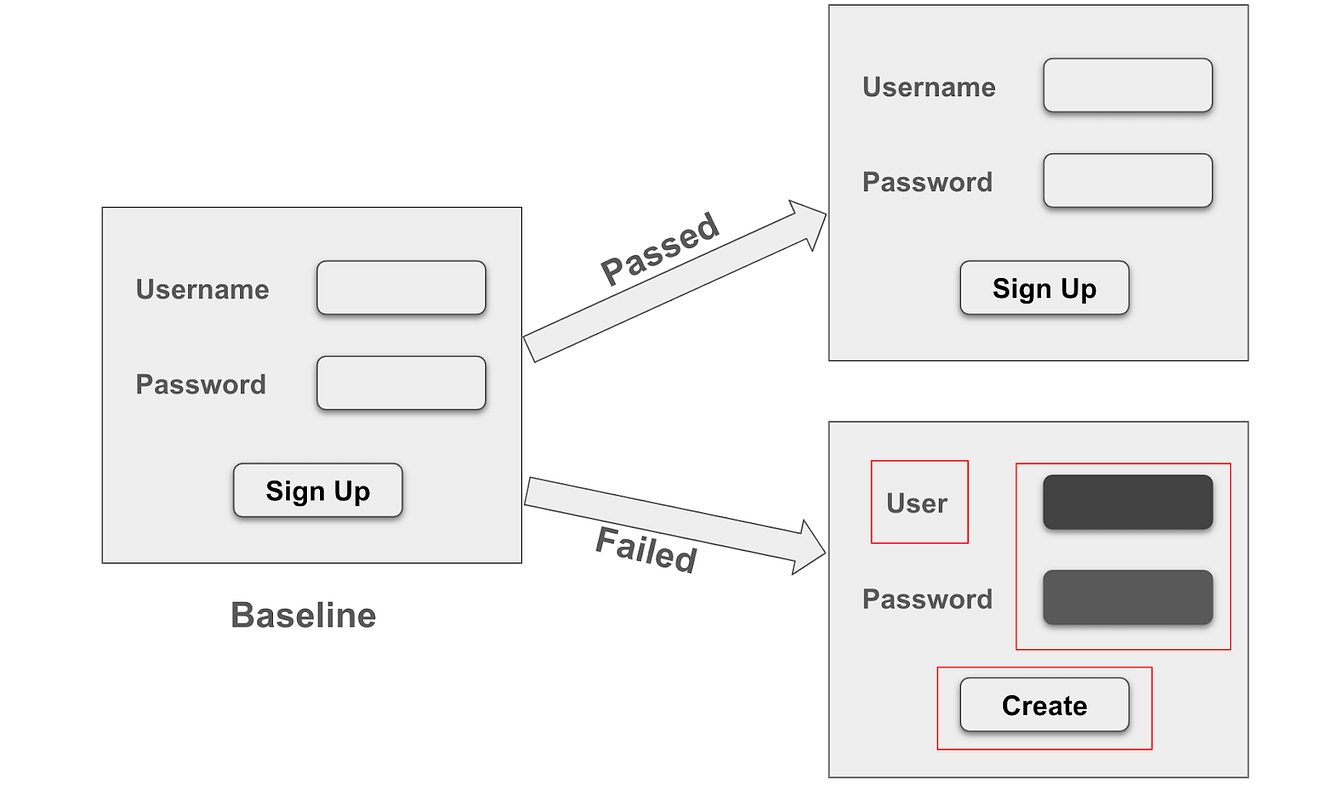
In the comparison above, the first image perfectly matches the baseline and passes, while the second image fails because of the many visual differences. These differences are all major and cannot be ignored, so the visual test is marked as failed.
Binary to Decimal Converter is a tool that converts binary numbers into their equivalent decimal form. Simply enter a binary number and let this converter do it for you.
However, these differences can sometimes be minor, such as a slight change in color tone due to resolution differences or a different font due to an unsupported font on some platforms or versions. In these cases, the tool or framework used for visual testing should ideally have some built-in intelligence in the comparison algorithm to avoid such failures and only highlight major UI variations.
Why is Visual Testing Important?
Visual testing, like other software testing techniques, is integral to working with web applications. It provides numerous benefits when performed and helps produce more visually reliable results. These include:
**Browser — Device Compatibility and Responsiveness
**Visual testing ensures an application’s user interface (UI) looks and behaves as expected across different devices and platforms. This includes checking on various operating systems (OS), browsers, screen sizes, and orientations.**Consistent User Experience
**Visual testing ensures the visual aspects of a user interface (UI) are correct and consistent. It helps to identify and fix issues with the layout, colors, fonts, and other visual elements of a UI, which can lead to a better user experience and satisfaction.**Verify Images & multimedia
**Verifying that all images and other multimedia elements are displayed correctly and in the intended resolutions is useful. This includes checking that the images are not pixelated or blurry on different platforms and screen sizes and that the videos play smoothly.
Additionally, visual testing helps ensure that the images and videos are aligned correctly with the surrounding text and other elements on the page. By doing so, visual tests help to make web applications visually appealing and user-friendly.**Testing Localization
**Visual testing is strongly advised when developing applications for international customers with diverse languages, cultures, and formats. It aids UI testing and ensures element consistency for different locales with minimal effort.
All the advantages of visual testing strongly advocate its usage while working with web applications to be used with a wide, varied customer base.
Decimal to Binary Converter is a free online tool that will give you the binary equivalent of any decimal number. Enter your number, then simply click ‘convert’.
When performing visual testing, it is essential to know its limitations. Visual testing is only suitable for certain types of applications, as it is limited to UI verification. Additionally, it can be time-consuming and resource-intensive for larger applications, which can add to maintenance overhead. Being mindful of these helps one make an informed decision on the extent of visual testing.
What is a Storybook?
Storybook is an open-source tool that lets you build, organize, and test user interface (UI) components in isolation. It is commonly used in web development, especially for building and testing components in JavaScript and related frameworks like React. Storybook allows testers to visualize, test, and debug the different states of UI components independently from the rest of the application.
In Storybook, each webpage is considered a story. A story represents the state of web elements in different environments. In a Storybook project, the first execution is always stored as-is, and the images from it are considered the base images or baseline. In this case, no screenshots or images are compared, and all are marked as approved. In subsequent runs after this one, you can see passed/failed stories based on the mismatch percentage, as screenshots are compared to this baseline.
The Storybook community is thriving with an impressive milestone. The Storybook Monorepo has surpassed 81,200 GitHub Stars, solidifying its position as one of the most popular repositories ever.
What is a Story?
In Storybook, each webpage is considered a story. A story represents the state of web elements in different environments. It captures the rendered state of a UI component.
What is a component?
Each piece of UI in Storybook is an independent component. With components, we don’t need to load the entire application to test a specific UI. We can render the component in isolation and test it before moving on to the rest of the application.
A tool that converts decimal numbers into equivalent octal representation. Input a decimal number and click ‘Convert Decimal to Octal’ to get the result in seconds!
How does a Storybook compare different components and stories?
In a Storybook project, the first execution is always stored as-is, and the images from it are considered the base images or baseline.
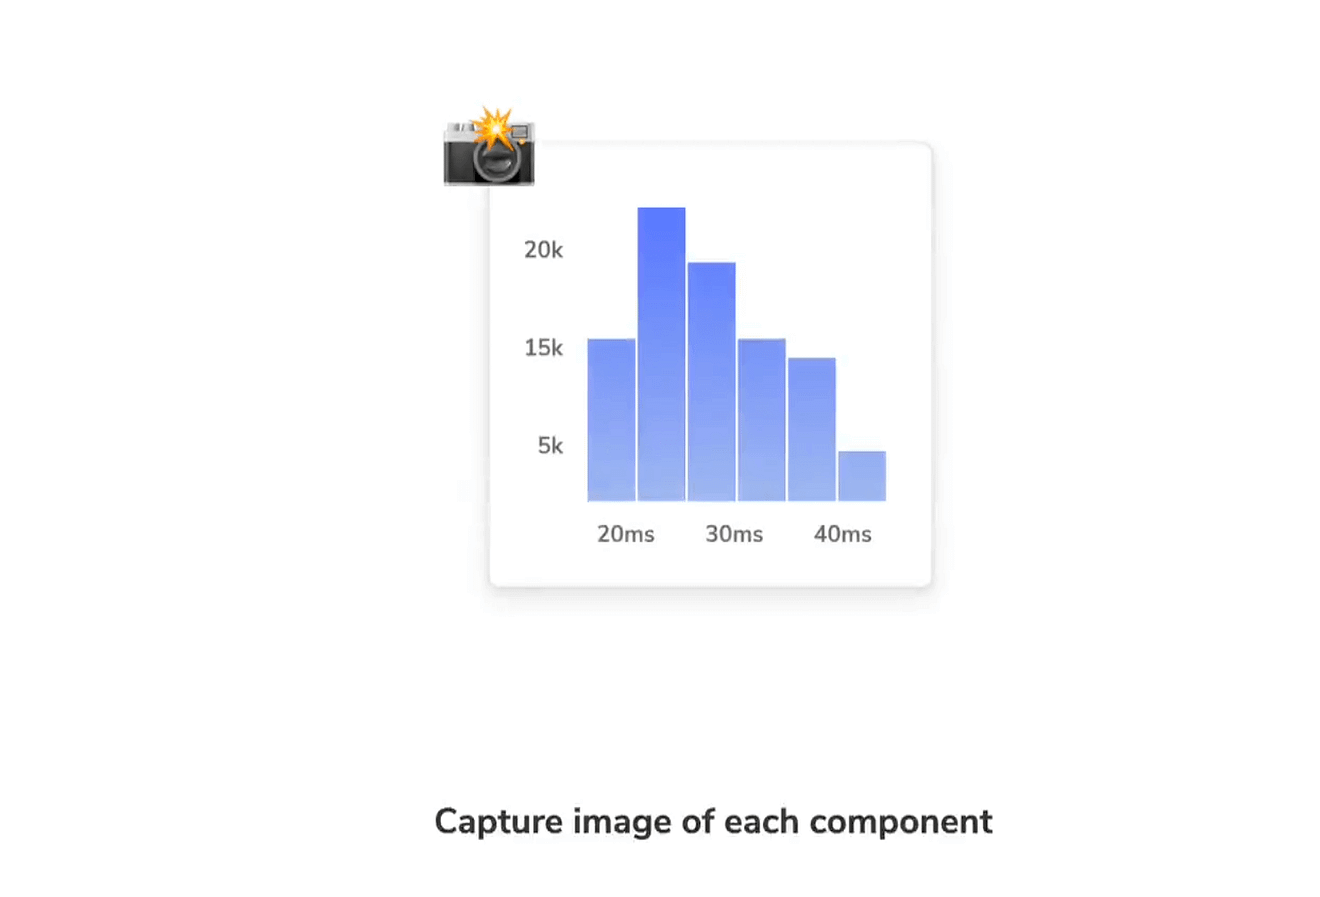
In this case, no screenshots or images are compared, and all are marked as approved.
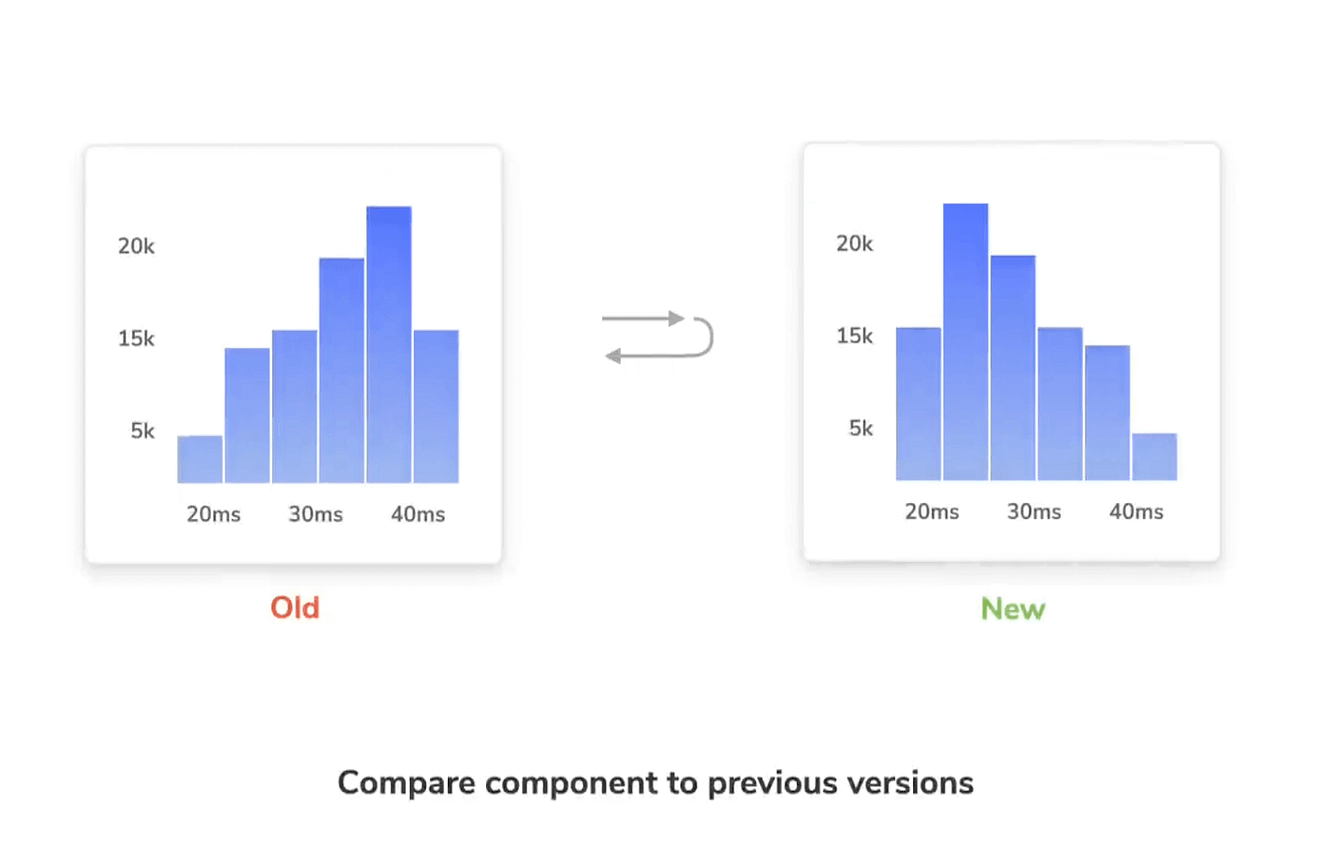
In subsequent runs after this one, you can see passed/failed stories based on the mismatch percentage, as screenshots are compared to this baseline.
A tool that converts decimal numbers into equivalent Hexadecimal representation. Input a decimal number and click ‘Convert Decimal to Hex’ to get the result in seconds!
Advantages of Using Storybook
There are many reasons why Storybook is the best choice for visual testing. Some of them are:
**Component Development and Isolation
**Storybook allows you to create, showcase, and test individual UI components in isolation. A component is a small piece of UI. This is especially useful when working with complex applications, as it allows you to focus and test a single component at a time without navigating through the entire application.**Component Documentation
**Storybook encourages the documentation of UI components by creating stories for each component. A story represents a component’s state and can include different variations for different environments. These stories serve as living documentation for the components, making it easier to understand and test how these should be used and how they look.**Automation and Regression Detection
**Visual testing in Storybook can be automated using various tools, such as Chromatic or custom scripts. When code changes are made to the UI, visual testing tools can take screenshots and compare them to baseline images. If there are any differences, such as unexpected layout changes or styling issues, the tool can flag them, which helps to catch visual bugs early in the development process.**Collaboration
**Storybook is a tool that can be used by developers, designers, and testers to collaborate on projects. Testers can use it to perform visual tests to verify the UI, designers can use it to see how components will appear in the final application, and developers can use it to receive feedback and bugs and iterate on them more effectively.**Integration with Other Tools
**Storybook can be integrated with various testing tools and platforms, including cloud-based platforms like LambdaTest SmartUI, which we will use in this blog. It can also be integrated with version control systems, continuous integration (CI) pipelines, and design systems to ensure consistency and quality in UI development.
Need to convert CSV to JSON? Try our free CSV to JSON converter tool to convert your CSV files to JSON format. Simple and easy to use. Try it now for free!
Demonstration: How to perform Storybook Visual Testing?
Having understood and learned the basics about visual testing and Storybook, it is time to move to the demonstration. This section will show how Storybook visual testing can be performed for your application.
As mentioned previously, to perform Storybook visual testing, we will use SmartUI, a tool provided by the cloud-based LambdaTest platform.
LambdaTest is an AI-powered test orchestration and execution platform that lets you run manual and automated tests at scale with over 3000+ real devices, browsers, and OS combinations.
SmartUI is a LambdaTest tool that combines the robustness of cloud-based platforms with the accuracy of visual testing. It helps automate identifying and tracking visual changes in the user interface (UI) over time, which helps release more consistent applications. SmartUI uses cloud benefits to provide precision, collaboration, and scalability. Using LambdaTest enables you to test your application on a combination of 3000+ OS and browser versions, ideally serving the aim of Storybook visual testing for the visual elements.
Pre-requisites
Install Storybook
Install Storybook using the below command. You can check more details on installation on its official website.
npx storybook@latest init
Make sure you install a version higher than 6.4.0 for best results. Refer to Storybook recent releases for more information on Storybook release versions.
Install Node.js
Install Node.js on your system by downloading the installer from the official website. For compatibility reasons, ensure the installed version is higher than 14.15.0. If you need more details on the previous versions, you can check here.
Looking to convert binary to hex? Convert binary numbers to hex with ease using our free online Binary to Hex Converter tool. Perfect for developers and coders.
LambdaTest SmartUI credentials
Create your account on the LambdaTest platform to access SmartUI and perform Storybook visual testing.
SmartUI Project Setup on LambdaTest
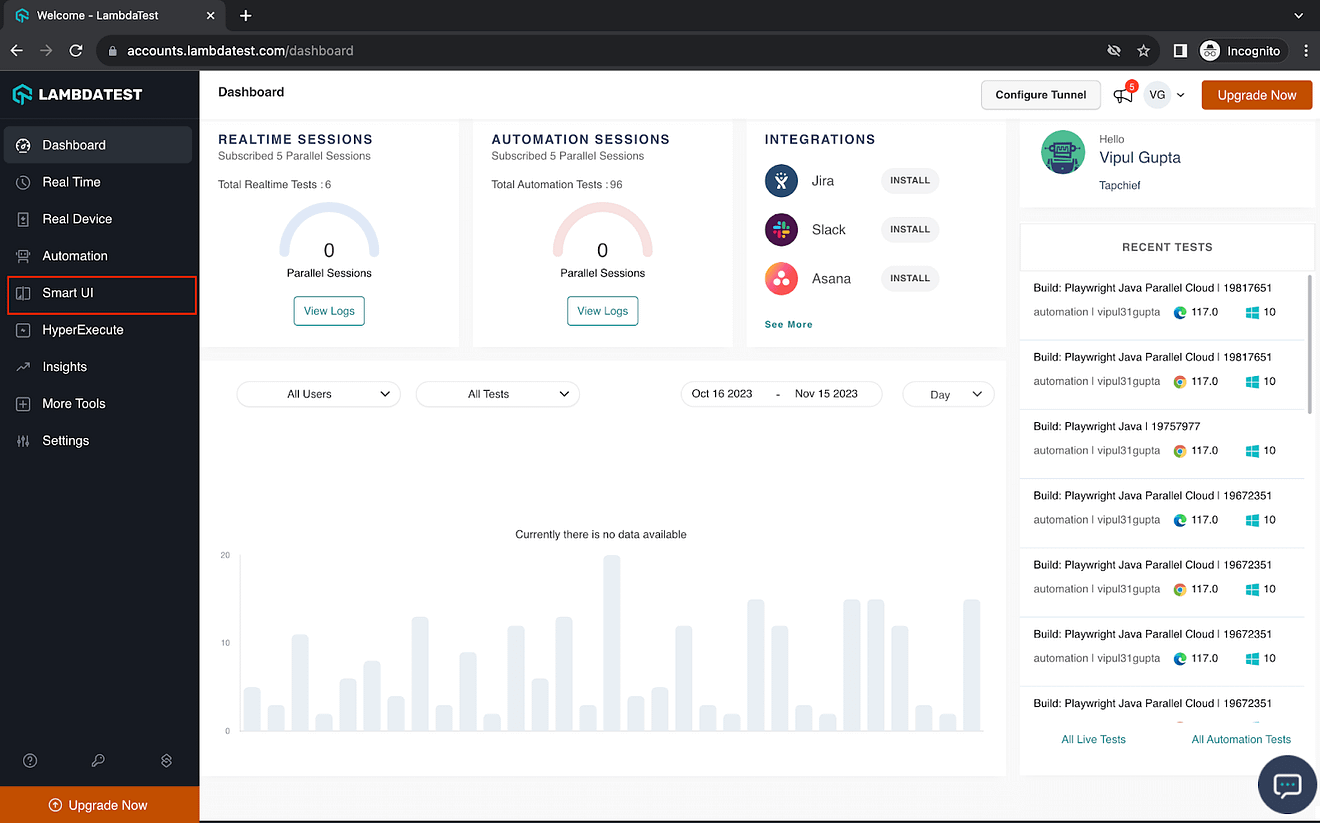
After completing the prerequisite setup, the first step is to create a SmartUI Project on LambdaTest. In this project, we will combine all your executed builds for our Storybook visual test cases.
Step 1. Login to your LambdaTest account and select Smart UI.
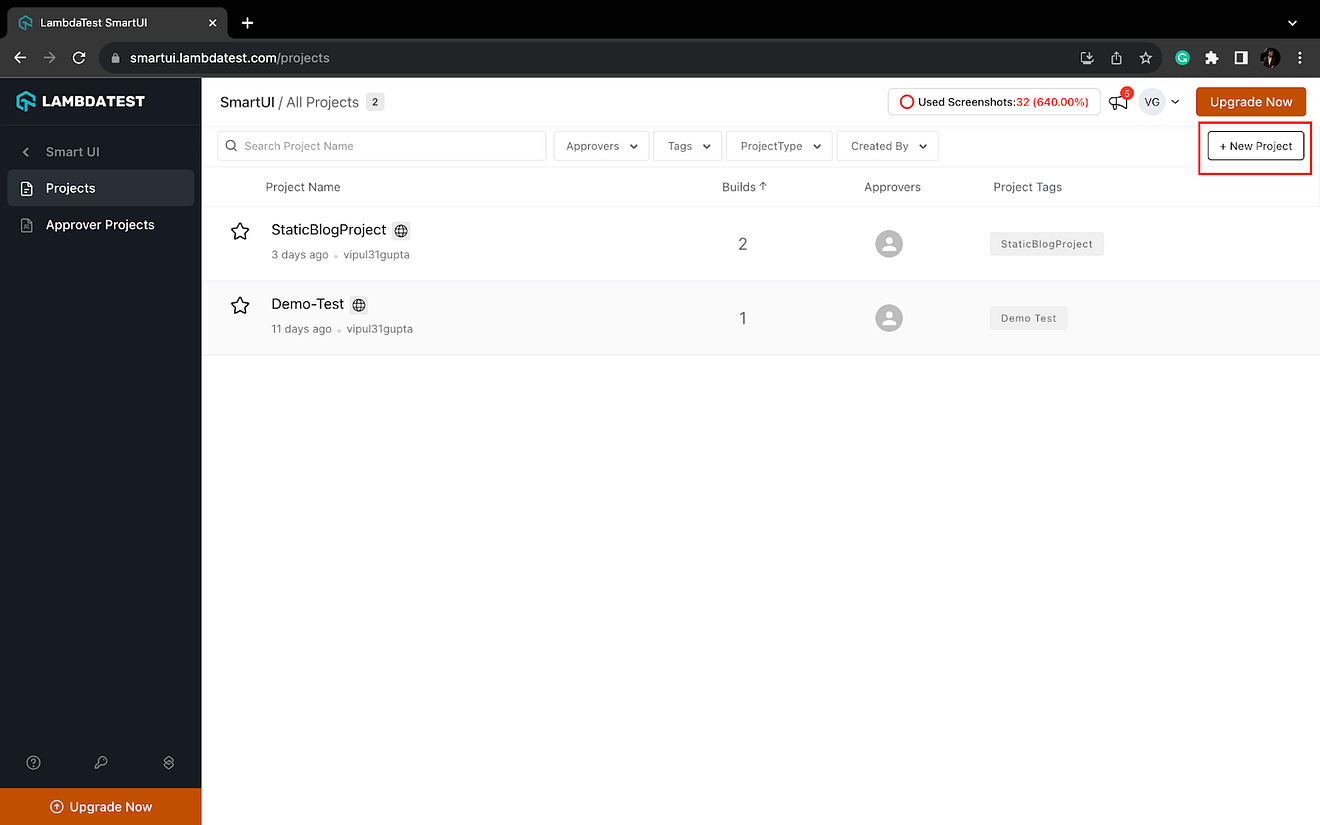
Step 2. Click on the New Project button to create your SmartUI Storybook project.
Step 3. For Storybook tests, select the platform as Web. Add project name, approvers for the changes, and tags for filters or easy navigation.
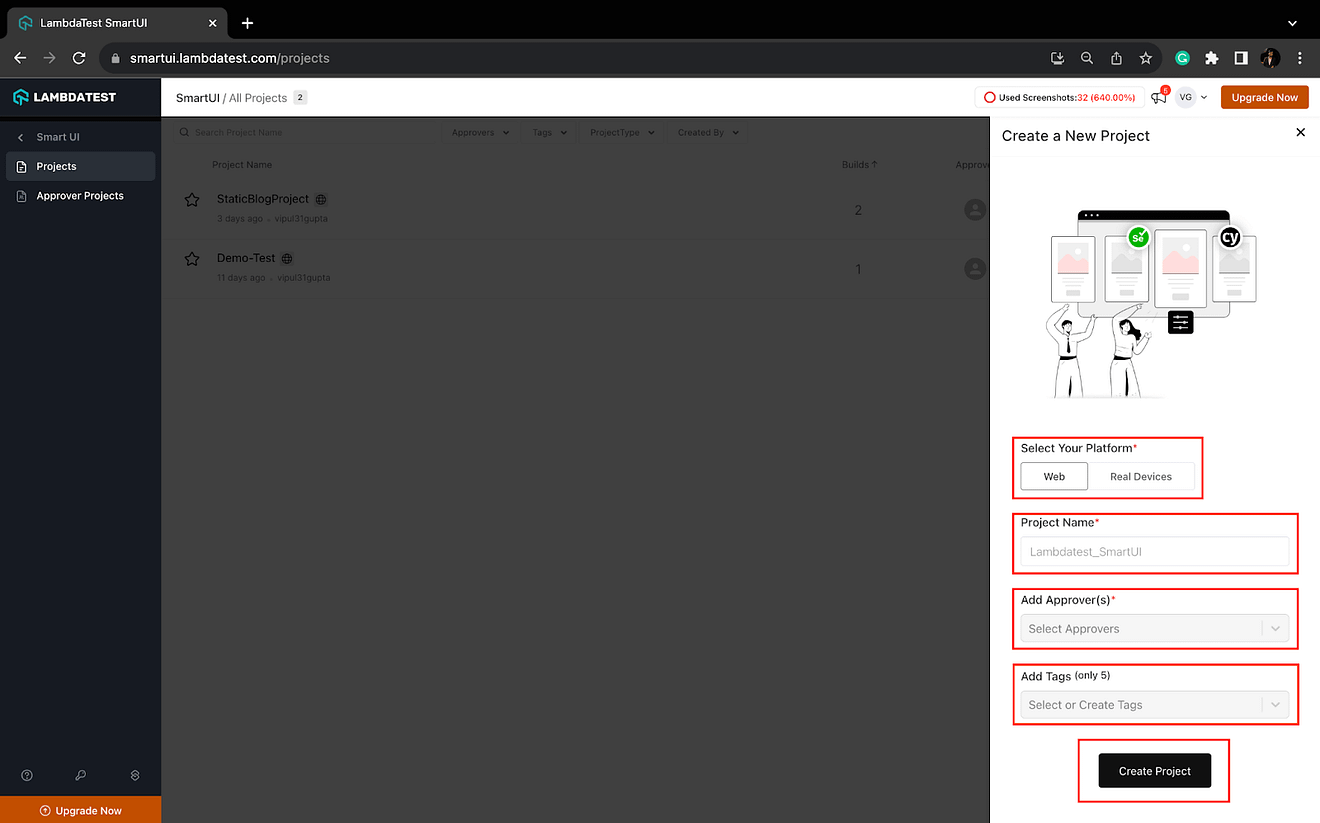
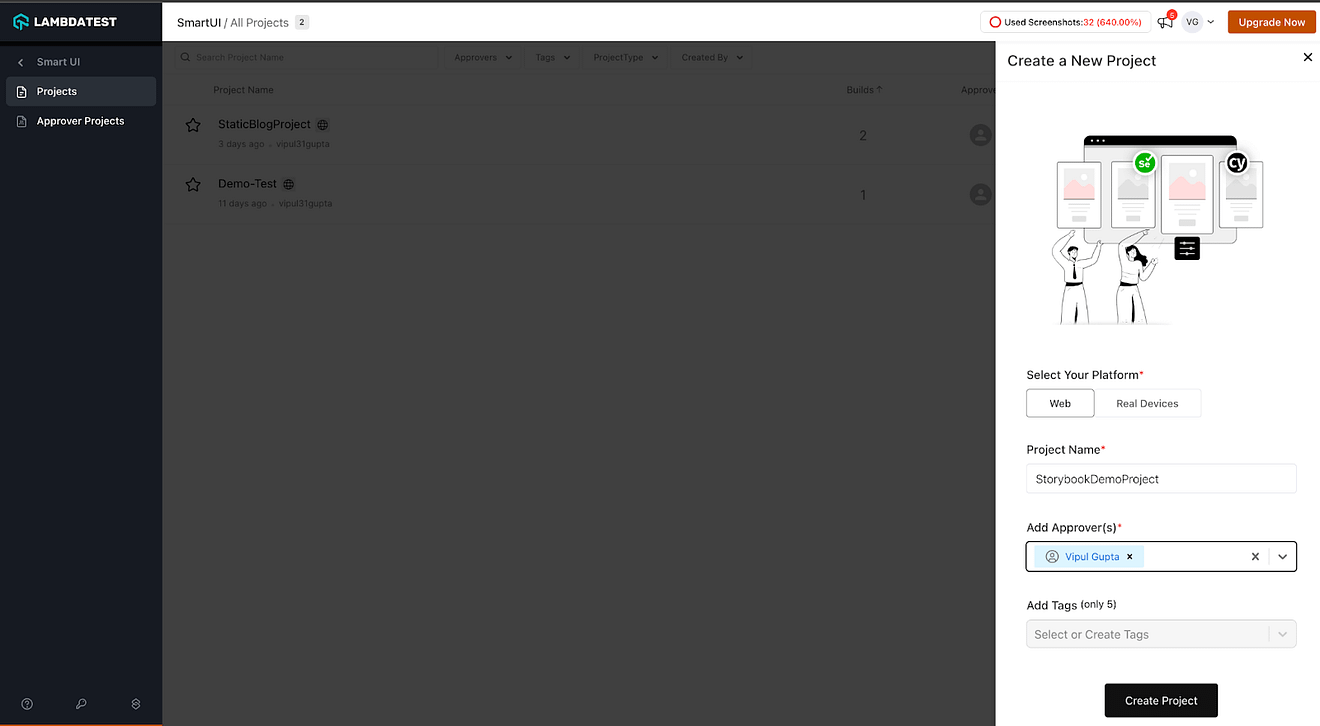
Step 4. Click on Submit to create your first project. You can see no build and the token is available inside the project.
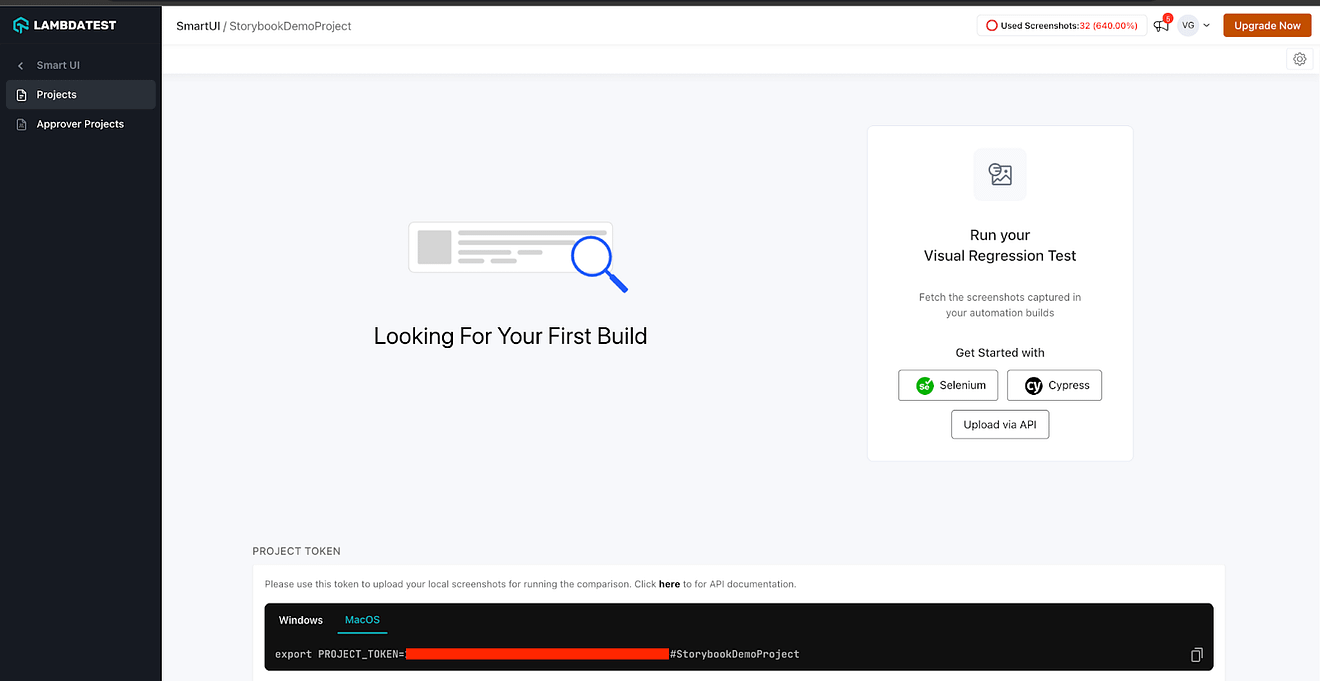
This token will be used in the next steps to link the project execution results on SmartUI.
From SQL to JSON in a snap! Convert SQL queries to JSON effortlessly with our SQL to JSON converter, enhancing compatibility and data interchange. Try it now!
Storybook Code Setup and Execution: Creating Baseline
For this blog demonstration on performing Storybook visual testing, we will reference the code from the GitHub repo below. This is a sample project to execute your first Storybook SmartUI project for visual testing.
Step 1. Clone the project from this GitHub repo.
git clone https://github.com/LambdaTest/smartui-storybook-sample.git

Step 2. Install the required NPM dependencies for LambdaTest Smart UI Storybook visual test execution.
npm install @lambdatest/smartui-storybook -g

Step 3. Verify that the .storybook directory is added to your main.js project. It should contain the following code. If not, add the same to it.
module.exports = {
   features: {
     buildStoriesJson: true,
   },
 };
Step 4. Install the Storybook node module inside your project using npm.
npm install
Once this is done, you should see @storybook under your < current-dir >/node_modules folder like below.

Step 5. Configure the SmartUI project token for the demo project that we created initially.
export PROJECT_TOKEN="123456#1234abcd-****-****-****-************"
Step 6. As mentioned, LambdaTest SmartUI provides configurations to execute visual tests on several available browser + OS combinations. These configurations are defined inside smartui.json.
Execute the following command to generate this configuration JSON.
smartui config create .smartui.json

Once the smartui.json file is created, you can see the default configurations in the same.
{
 "storybook": {
   "browsers": [
     "chrome",
     "firefox",
     "safari",
     "edge",
     // Add more browser configuration here
   ],
   "viewports": [
     [1920, 1080]        // Add more view ports to capture here
   ],
   "waitForTimeout": 0, // (Optional) Add wait time for the page to load
   "include": [],       // (Optional) Only compare limited stories
   "exclude": []        // (Optional) Don't compare the stories
 }
}
The configurations can be modified as per your requirements by changing the key-values on this JSON.
Stop using the same password for everything! Create strong and unique passwords that are difficult to guess with our Random Password Generator. Try it now!
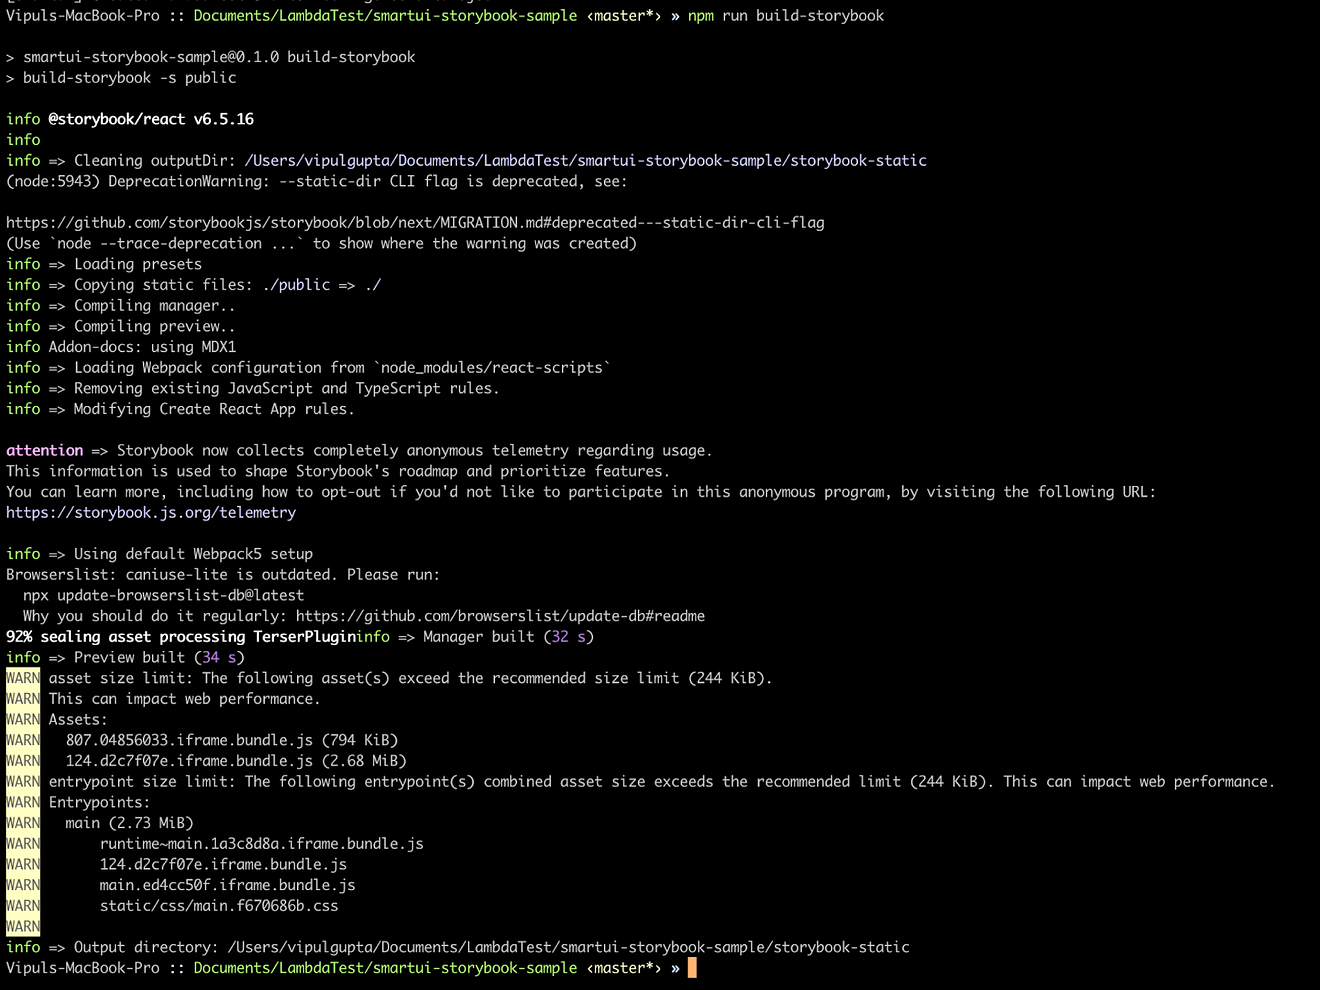
Step 7. Build your Storybook application, in this case, the repo code, as a static web application. Storybook will create a static web application capable of being served by any web server for your code, which can be previewed locally on any system by sharing the application code.
npm run build-storybook
Executing this command should create an output directory /storybook-static/ from which the code will be built for execution on SmartUI.
Step 8. Finally, we execute the Storybook visual tests on the SmartUI cloud using the storybook static build created in previous steps.
smartui storybook ./storybook-static --config .smartui.json
This command would trigger the run to create a Baseline, as this is the first execution. All stories would be approved automatically for this execution.
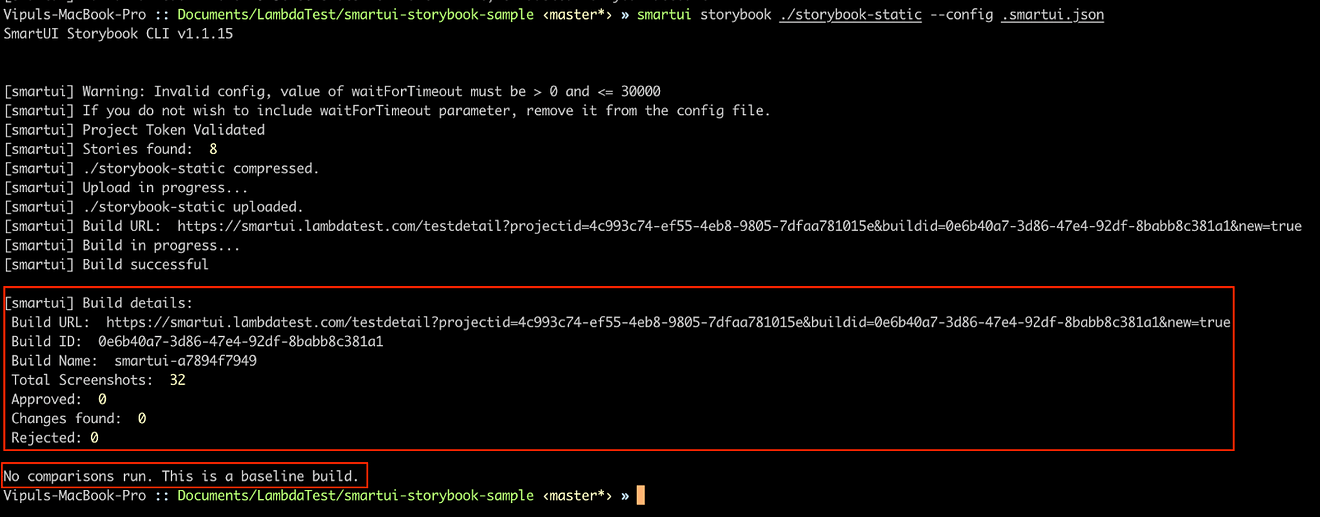
You can view the created baseline for Storybook visual tests on SmartUI by navigating to your project on the LambdaTest Dashboard. This build will be created on the master branch.

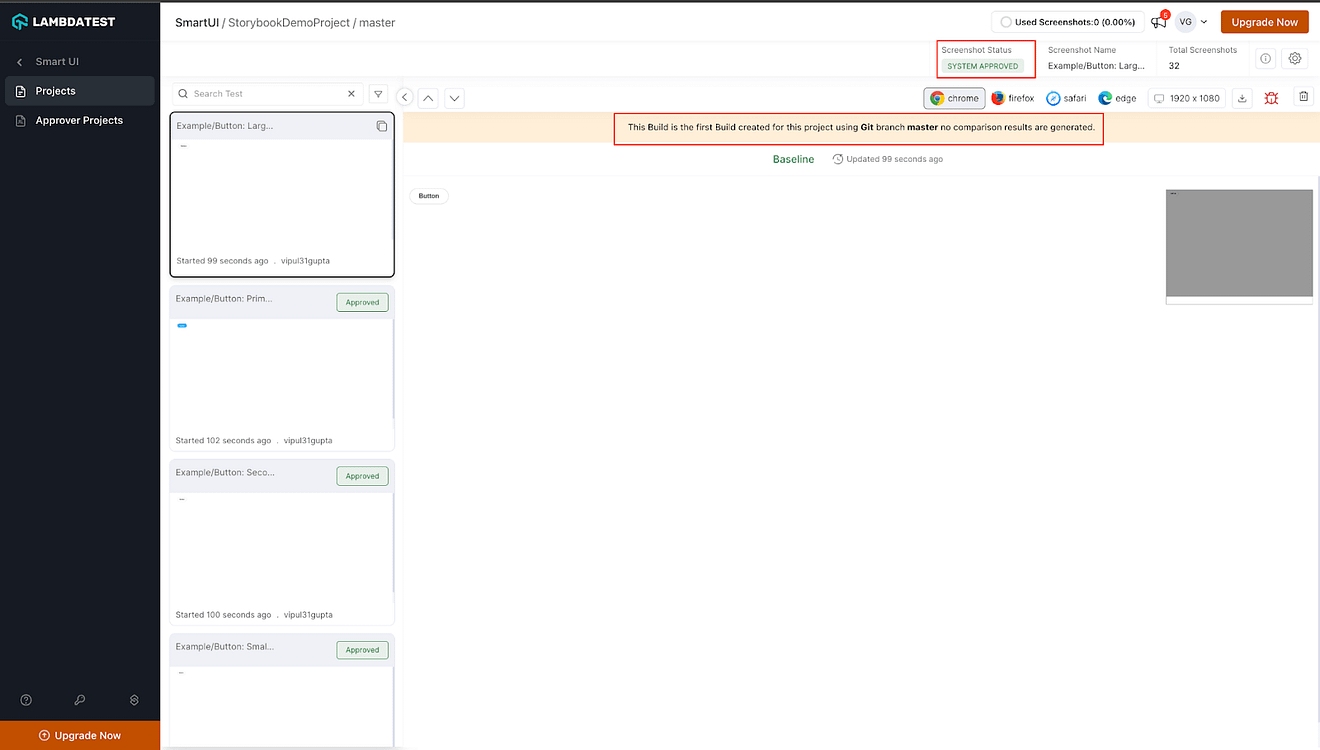
With this, we have created a baseline for the stories to be executed further to perform Storybook visual tests. Let’s move forward to change any story, re-execute the run, and see results.
Storybook SmartUI Execution: Committed Code Changes
In this section, we see how SmartUI triggers the storybook visual test on changes committed to the existing code.
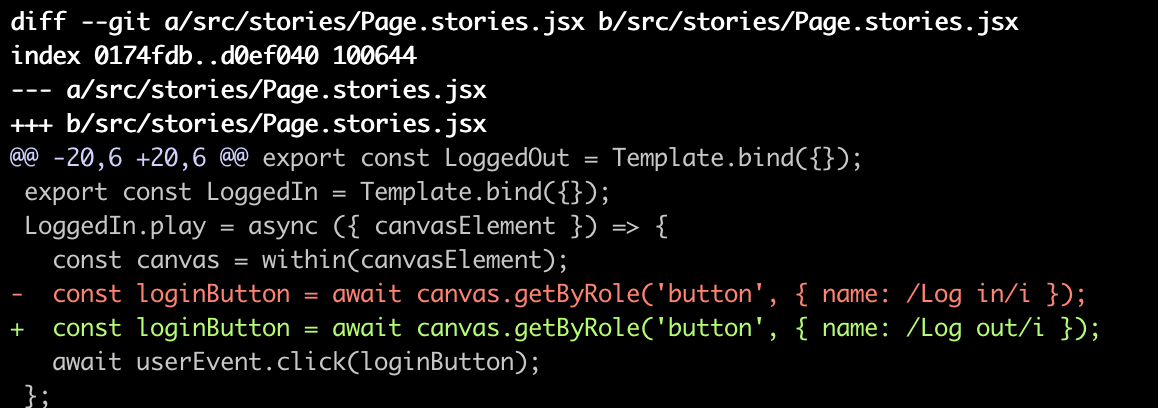
Step 1. Open src/stories/Page.stories.jsx story file and make some changes to it. For this demonstration, I have updated the value from Log in to Log out.
Step 2. Add the file with changes to GitHub. SmartUI uses the GitHub commitid for the comparison.
git add src/stories/Page.stories.jsx
Step 3. Commit the changes with a proper commit message. This message will be visible on the LambdaTest SmartUI project to identify the execution of a particular commit.
git commit -m "Demo blog changes in Page.stories.mdx"
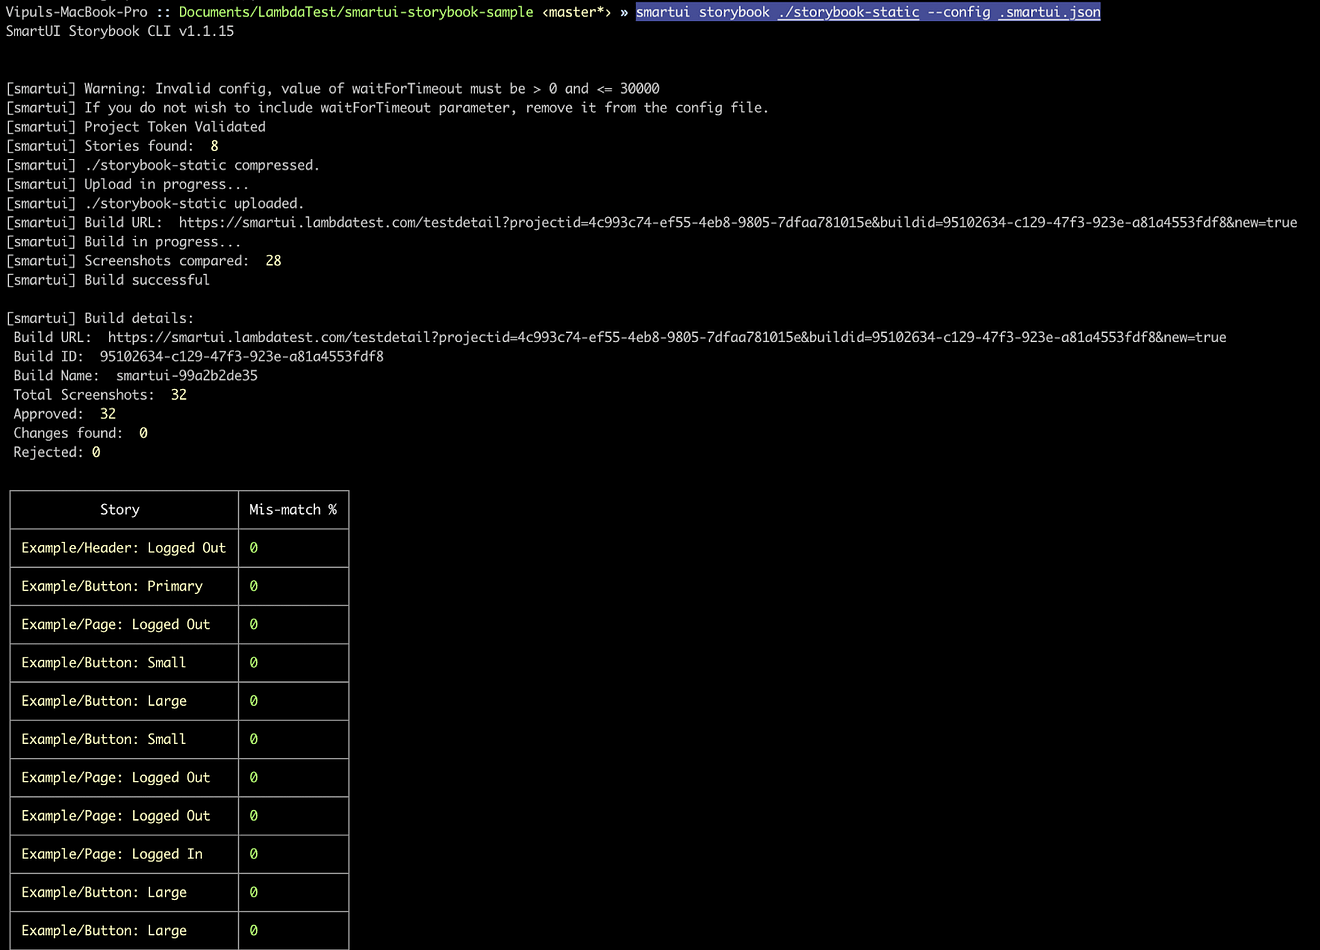
Step 4. Execute the Storybook visual tests on the SmartUI cloud again as previously done. This time, it will give the comparison results and highlight failures if any mismatches occur.
smartui storybook ./storybook-static --config .smartui.json
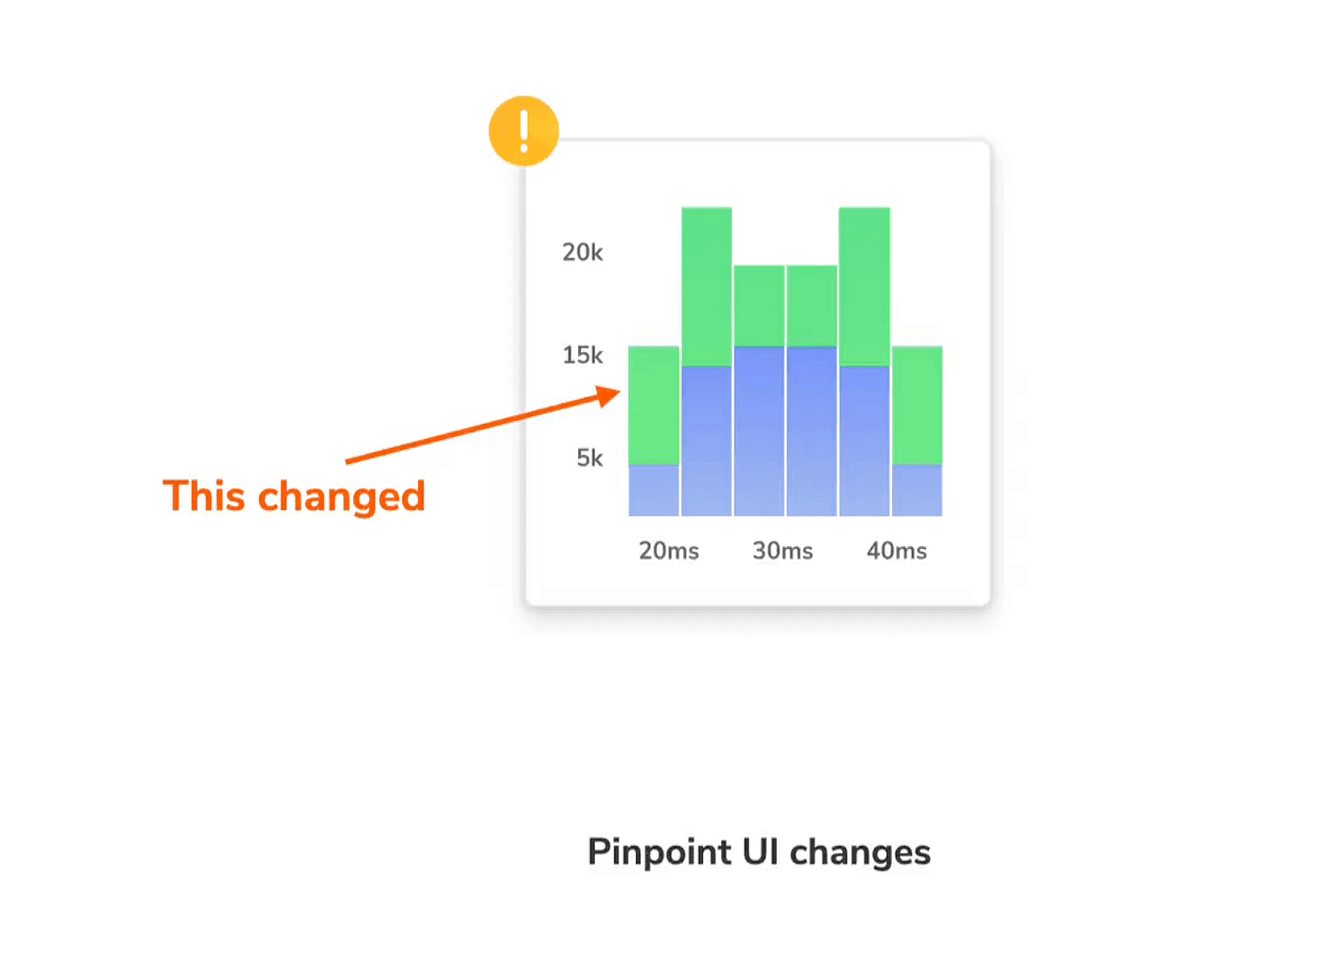
You can see the output results on the CLI below.
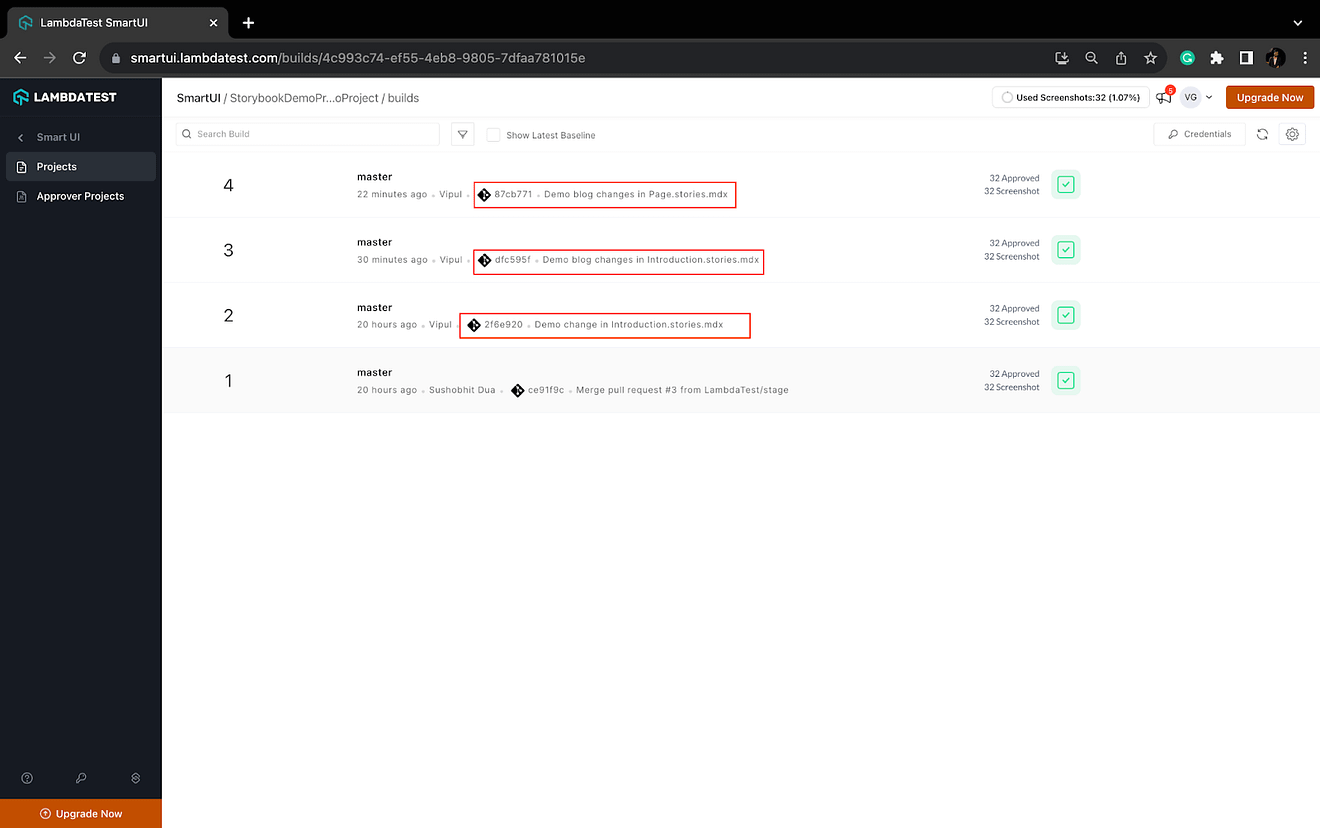
Execution results on the SmartUI dashboard can be viewed for the particular commit.
With this, we have learned how Storybook visual testing works with LambdaTest SmartUI. So, use this powerful integration of tools and platforms to build a robust visual testing architecture for your static web applications.
Generate custom QR codes for your business or personal needs with our fast and easy-to-use QR code generator online tool in seconds. Try it now!
Conclusion
This concludes our blog on how to perform Storybook visual testing. In this Storybook testing tutorial, we learned about visual testing, its advantages and disadvantages, and why it is needed in web software development. We also understood about Storybook and its benefits for visual testing. Lastly, we saw how Storybook visual tests can be configured and executed on the LambdaTest SmartUI cloud platform to take advantage of a cloud platform and execute on various OS and browser combinations. It’s time for you to get started and perform Storybook visual tests on SmartUI for the best results and performance. Happy testing!